Ever thought about using a percolator to make coffee? If the answer is no, you’re not alone. Most of us think about how to use drip coffee makers or French presses before we consider a percolator.
The good news for people who love a great cup of joe is that making it with a percolator isn’t complicated. You don’t need all kinds of technical knowledge or fancy equipment to get started. And, if you know how to use a percolator correctly, the way it works can deliver coffee that’s pretty amazing too.
Let’s take a look at how to use a percolator and exactly what a percolator is.
We want you to know this post contains affiliate links. If you click on a product and decide to buy it we may earn a small commission at no extra cost to you.
What Is A Percolator?
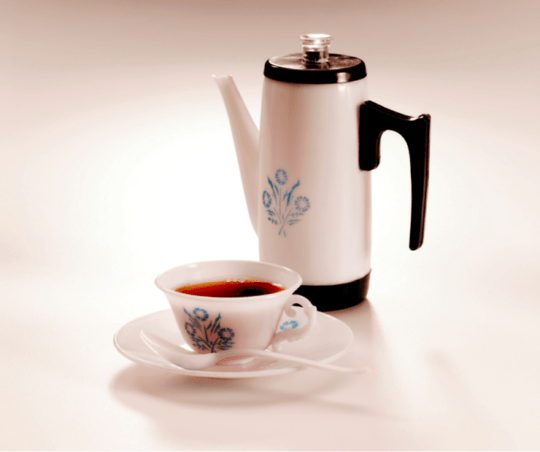
A percolator is a steam-powered coffee brewer. Percolators look like tall skinny kettles from the outside. On the inside, there are two separate chambers; one for water and one for the coffee grounds. The chambers are connected by a tube that has a small hole at the bottom.
When you heat up the water in the chamber, it begins to produce steam. The pressure from this steam forces liquid through the tube and into the chamber containing coffee grounds. The liquid drips out of the percolator and into your cup.
The thing that makes percolators so unique is how they work.
A percolator uses a simple mechanism, the same way it works every time, to brew coffee. It’s basically like boiling water and having it drip through your grounds.
When you do this, there are important reactions that take place within the bean that makes for incredibly flavorful coffee.
Moka pots work in a similar fashion but, unlike a percolator, the espresso in a Moka pot doesn’t continue cycling through the brewer until it’s removed from the heat.
What You Need To Make Percolator Coffee
You’re going to need pretty much the same supplies as you would if you were using other active brewing methods. Whole coffee beans, coffee grinder, a coffee scale (optional) or measuring utensil, and water.
And of course, a stovetop percolator.
How To Use A Percolator To Make Coffee
Step 1: Grind Your Coffee Beans and Measure Your Coffee
Bust out your coffee grinder and your favorite coffee beans, it’s time to get to work.
Coarse ground coffee is a must for percolators, think the same size grind you use for your French press.
This is a non-negotiable so if your coffee grinder isn’t capable of this grind size you’ll want to purchase one that is before you begin making percolator coffee.
When your coffee is coarsely ground your next step is measuring. Do not wing it, you will regret it if you do.
The most common reason percolator coffee turns out poorly is an incorrect coffee-to-water ratio. We highly recommend using a coffee scale to ensure accuracy but, if you don’t have one just be sure to measure your coffee carefully.
We tend to go with one tablespoon of coffee per cup of water but, don’t hesitate to adjust the ratio depending on what your taste preference is.
Step 2: Prep The Percolator
You’ll need to make sure your percolator is clean and ready to go before you get started. Once that’s done you’re ready to assemble your percolator.
First up is pouring cold water into the percolators reservoir.
Then put the filter basket inside the percolator and add your freshly ground coffee to the basket.
Let’s be real here, sometimes there just isn’t enough time to grind your own coffee and there’s no side-eye here, pre-ground coffee as long as it’s coarse ground will work just fine too.
Once everything is ready, put the lid on and you’re ready for the next step.
Step 3: Heat The Percolator (Slowly!)
Place your percolator on the stovetop.
Be careful how quickly you heat your percolator because, if you do it too quickly you’ll either have a really strong or a really weak cup of coffee. It all depends on how hard the steam is pushing when it comes in contact with your coffee grounds.
A good rule of thumb to follow here is heating the water on medium-low to medium heat until it starts percolating.
You don’t want the water to boil. Ideally, you want to see a bubble every couple of seconds.
If you see a steady stream of bubbles you’ll want to turn the heat down just a tad and if you don’t see enough bubbles bump it up just a bit.
Step 4: Perk Perk Perk!
After the percolator starts perking you’ll want to keep it around that bubble every couple of seconds zone if possible.
You knew this was coming, how long you leave your perked coffee before removing the lid will slightly affect how strong it is.
For a stronger cup of coffee leave the lid on for about 6-8 minutes before removing it, for milder tasting percolator coffee remove the lid after 2 to 3 minutes.
Longer than 10 minutes and you’re likely going to end up with bitter and burnt tasting coffee.
Step 5: Remove It From The Heat and Discard The Grounds
Remove your percolator from the heat, be extra careful because it’s going to be hotter than h-e double hockey sticks.
Remove the lid and discard the used coffee grounds. If you can let the coffee sit for a couple of minutes. This will allow time for any grounds that have found their way into your coffee to settle to the bottom of the percolator.
Step 6: Serve It Up!
Serve your coffee, plain or with sugar, milk or coffee creamer.
Some folks like to add a little bit of chocolate for that mocha flavor but hey, that’s none of our business how you drink your percolator coffee!
How To Clean A Percolator Coffee
It’s best to clean your percolator immediately after use to avoid oils and residue from building up.
Pour out any coffee that might still be in the pot and rinse out the filter basket with hot water. If you see any pesky little grains of coffee hiding behind the mechanism that holds the filter basket then use a washcloth or paper towel with some soap to clean that area.
After you’ve cleaned out the inside of your percolator and made sure it’s all good and dry, call it a day and store it away until next time.
Is A Stovetop or an Electric Percolator Better?
This is one of those, it really depends on how you like your coffee questions.
Electric percolators are definitely more convenient.
They don’t require any attention besides pressing a button. On the downside, they’re more expensive and if you want something portable for say camping they’re not going to fit that bill.
Stovetop percolators, on the other hand, do require your undivided attention because how long you leave the lid on to perk will affect how strong it is. They’re portable though and very friendly to the wallet.
Final Word
Making coffee is personal right down to what brewing method you prefer and what your favorite coffee beans are.
There are a lot of methods to choose from but, chances are the percolator isn’t the first one that comes to your mind. Let’s be real, it’s kind of a retro device.
That said, if you know how to use a percolator to make coffee – and know how to use it right, it’s so dang good on top of being easy and fairly quick.
People have been enjoying coffee the percolator way for a long time and if you ask us it seems kind of silly to mess with that. Give the percolator a try, how bad can it be?
We hope this was helpful, happy caffeinating!
FAQ’s
Are A Percolator And A Moka Pot The Same?
They sure aren’t and ironically they have more in common with other coffee brewing methods than with each other. Moka pots use high pressure to push water through finely-ground coffee. Percolators also use water vapor but it slowly goes through coarsely ground coffee. The processes are similar in terms of the water vapor but they yield very different results. Coffee from a Moka pot is espresso-like and coffee from a percolator is similar to drip coffee.
What Kind Of Coffee Is Best To Use With A Percolator?
Coarse ground coffee is the best to use with a percolator. The grounds are similar to the size of granules but they’re not exactly granules. If you have experience using a French press you want the same size grind you use for that. Whole beans are best because you can control the grind size but, there’s no shame in buying pre-ground coffee either as long as the grind is coarse.
What Is The Ratio Of Coffee To Water In A Percolator?
There isn’t a universal ratio for how much water to how much coffee you use with a percolator. As a general guide 1 tablespoon of coffee per cup of water. This will produce a fairly strong cup. If you prefer a weaker cup try 1 teaspoon of coffee per cup of water.
Do You Need To Use A Filter With A Percolator?
You don’t technically need to use a paper filter with your percolator but it’s something worth considering. Coffee grounds are held in a metal basket with holes at the bottom but it’s not foolproof and using a paper filter will keep stray grounds from sneaking into your cup of coffee.
How Do You Know When Percolator Coffee Is Done?
Anywhere from 6-8 minutes of perking time is usually how long you want to go depending on how strong you like your coffee. 6 minutes if you want it mild and 8 if you like it stronger. If that sounds too long don’t worry, the water will go up in spurts. You’ll know when it’s done when the perking stops. Don’t be surprised if it takes a few runs to learn how to use your percolator and find your sweet spot, it really varies on how strong you like your coffee.